
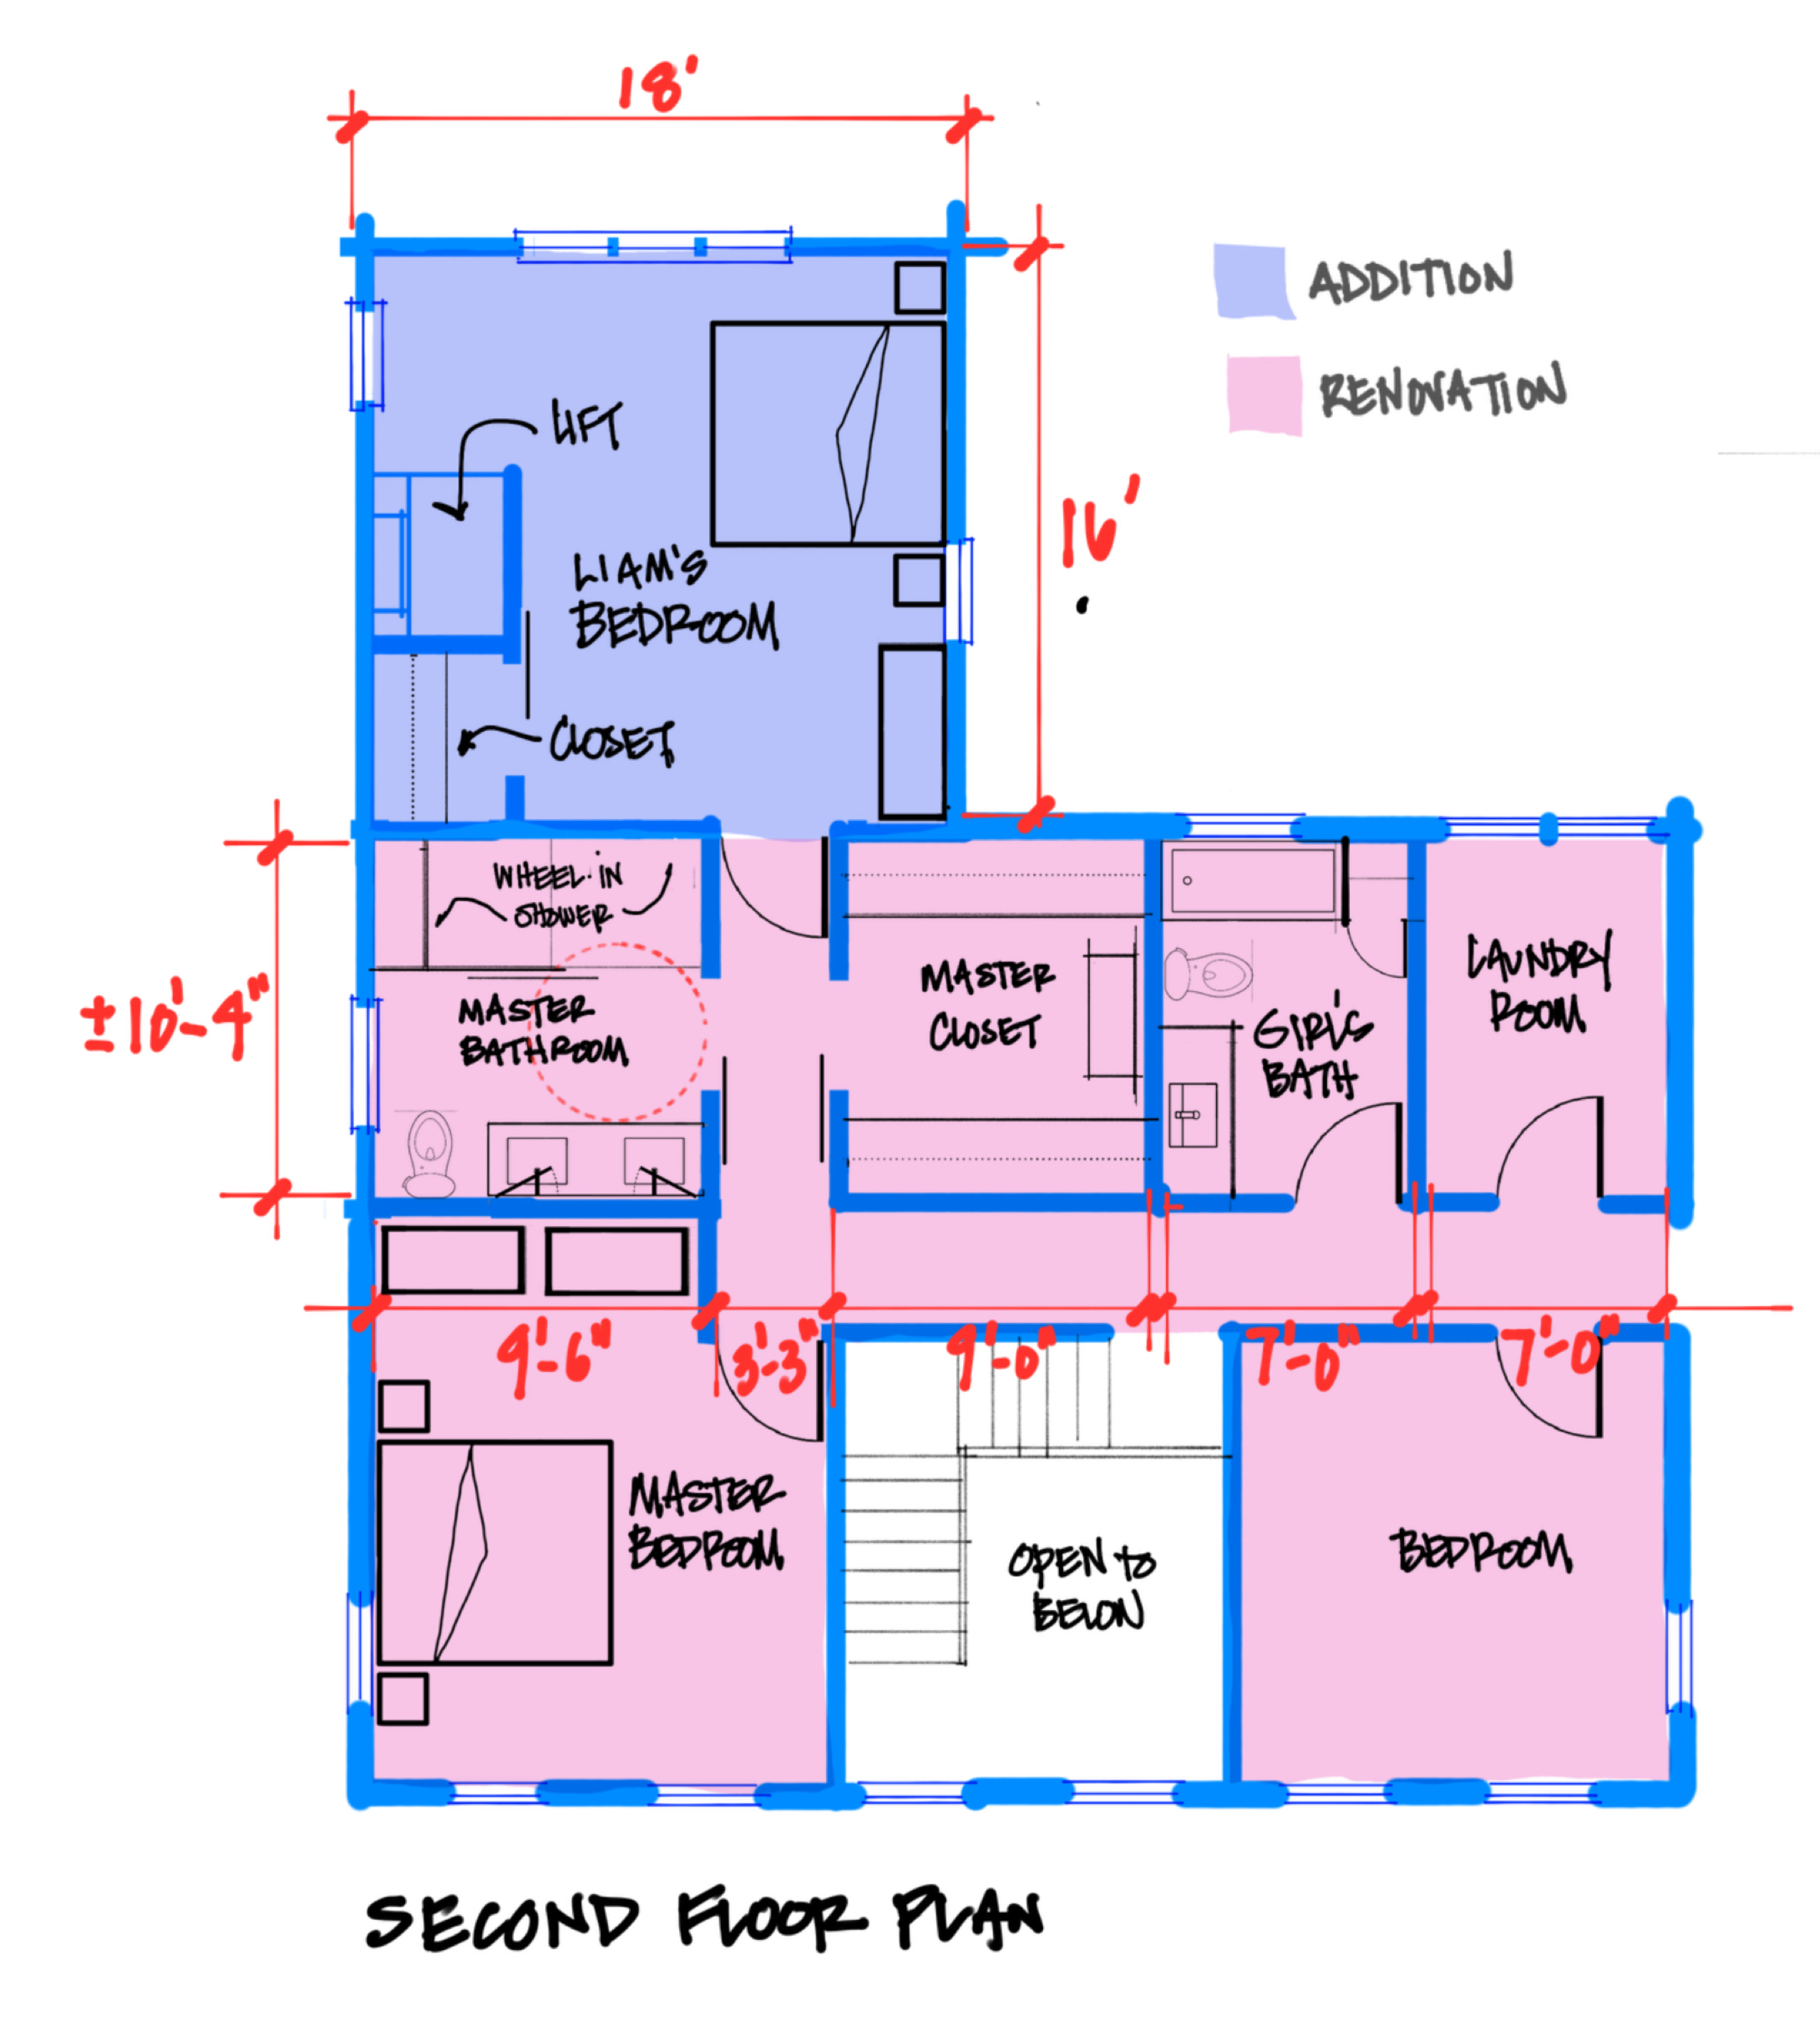
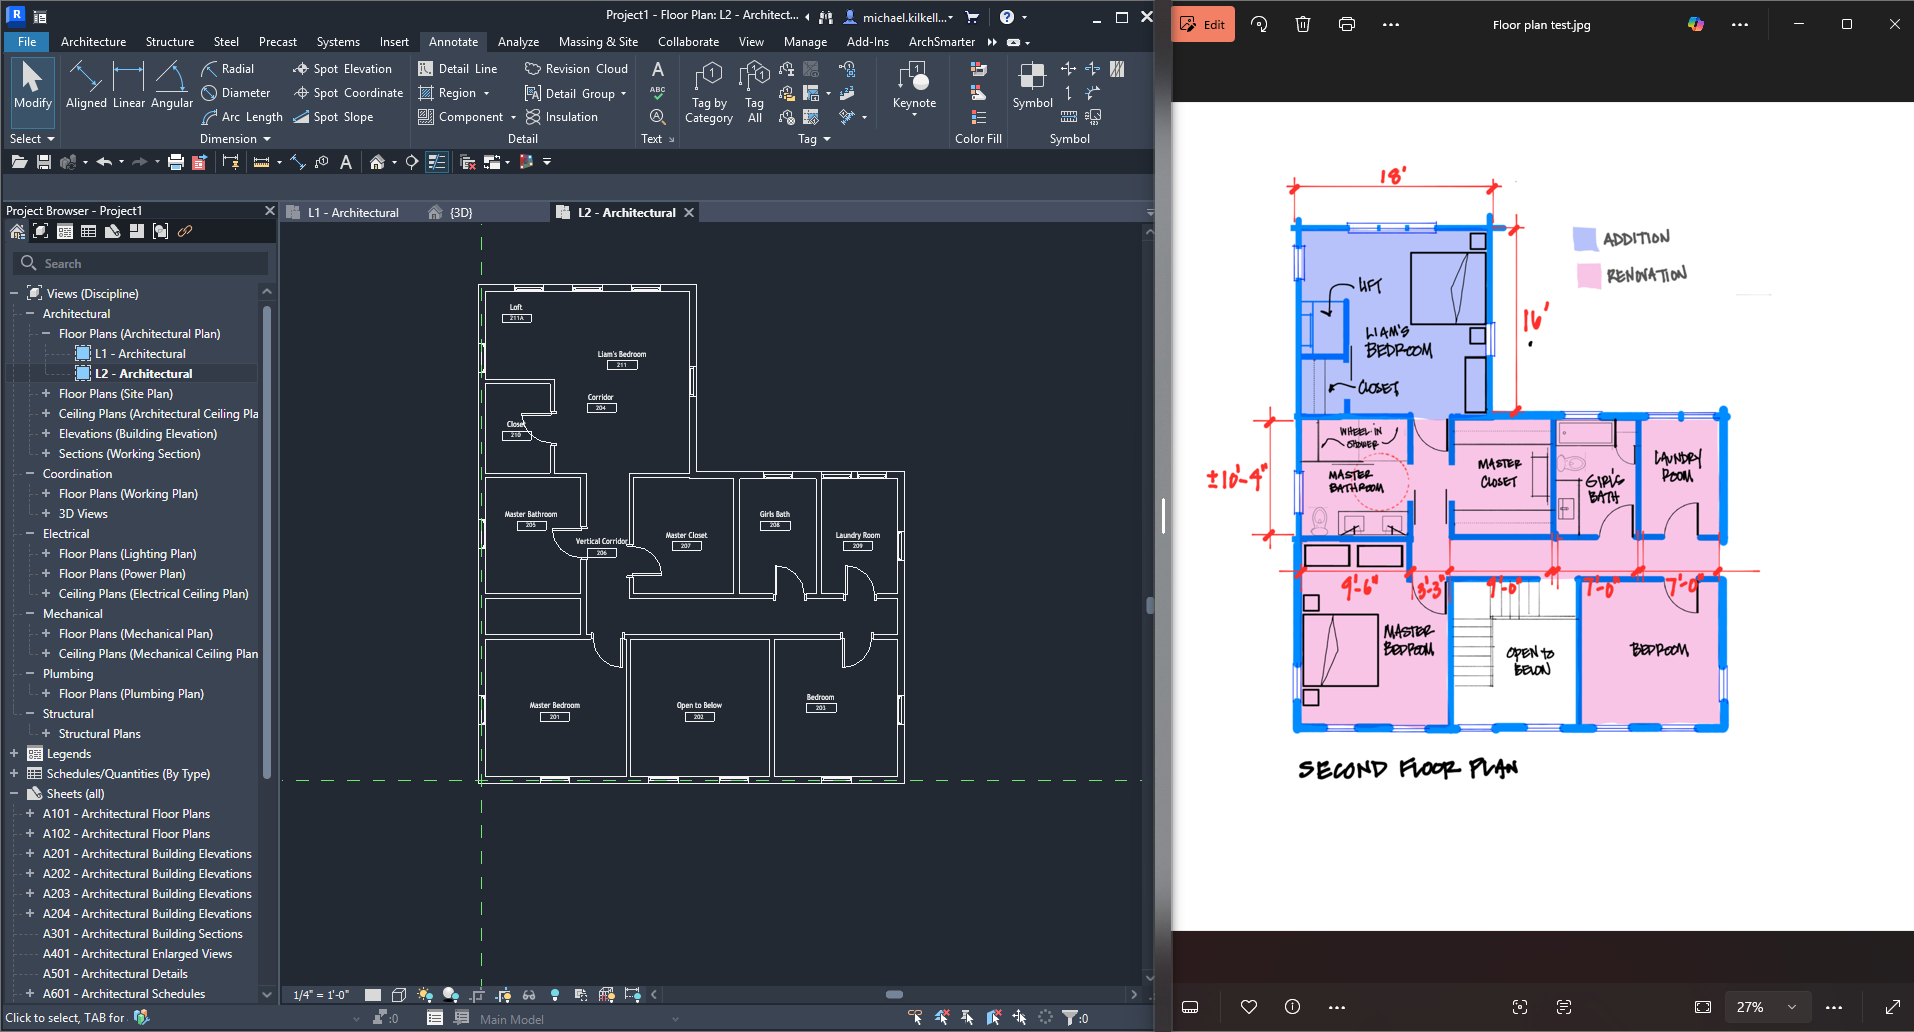
An architect friend handed me a sketch for a renovation project. Existing house, addition off the back, the usual residential scope. Bedrooms, bathrooms, closets, corridors, a handful of dimensions scribbled in the margins. Not a lot to go on, but enough to start modeling.
Instead of opening Revit and tracing walls, I fed the sketch to Claude.
Thirty-five minutes later, I had 19 walls, 7 doors, 16 windows, and 12 rooms inside a Revit model. I’d estimate the result was about 85% accurate. Not perfect. But I didn’t draw a single wall myself. Here's a demonstration of the process:
Read on for a description of how the pipeline works, what went right, what failed, and whether any of this is actually worth your time right now.
The Three-Step Pipeline
The process relies on three tools working together: a Claude skill, a web viewer, and a custom Revit add-in.
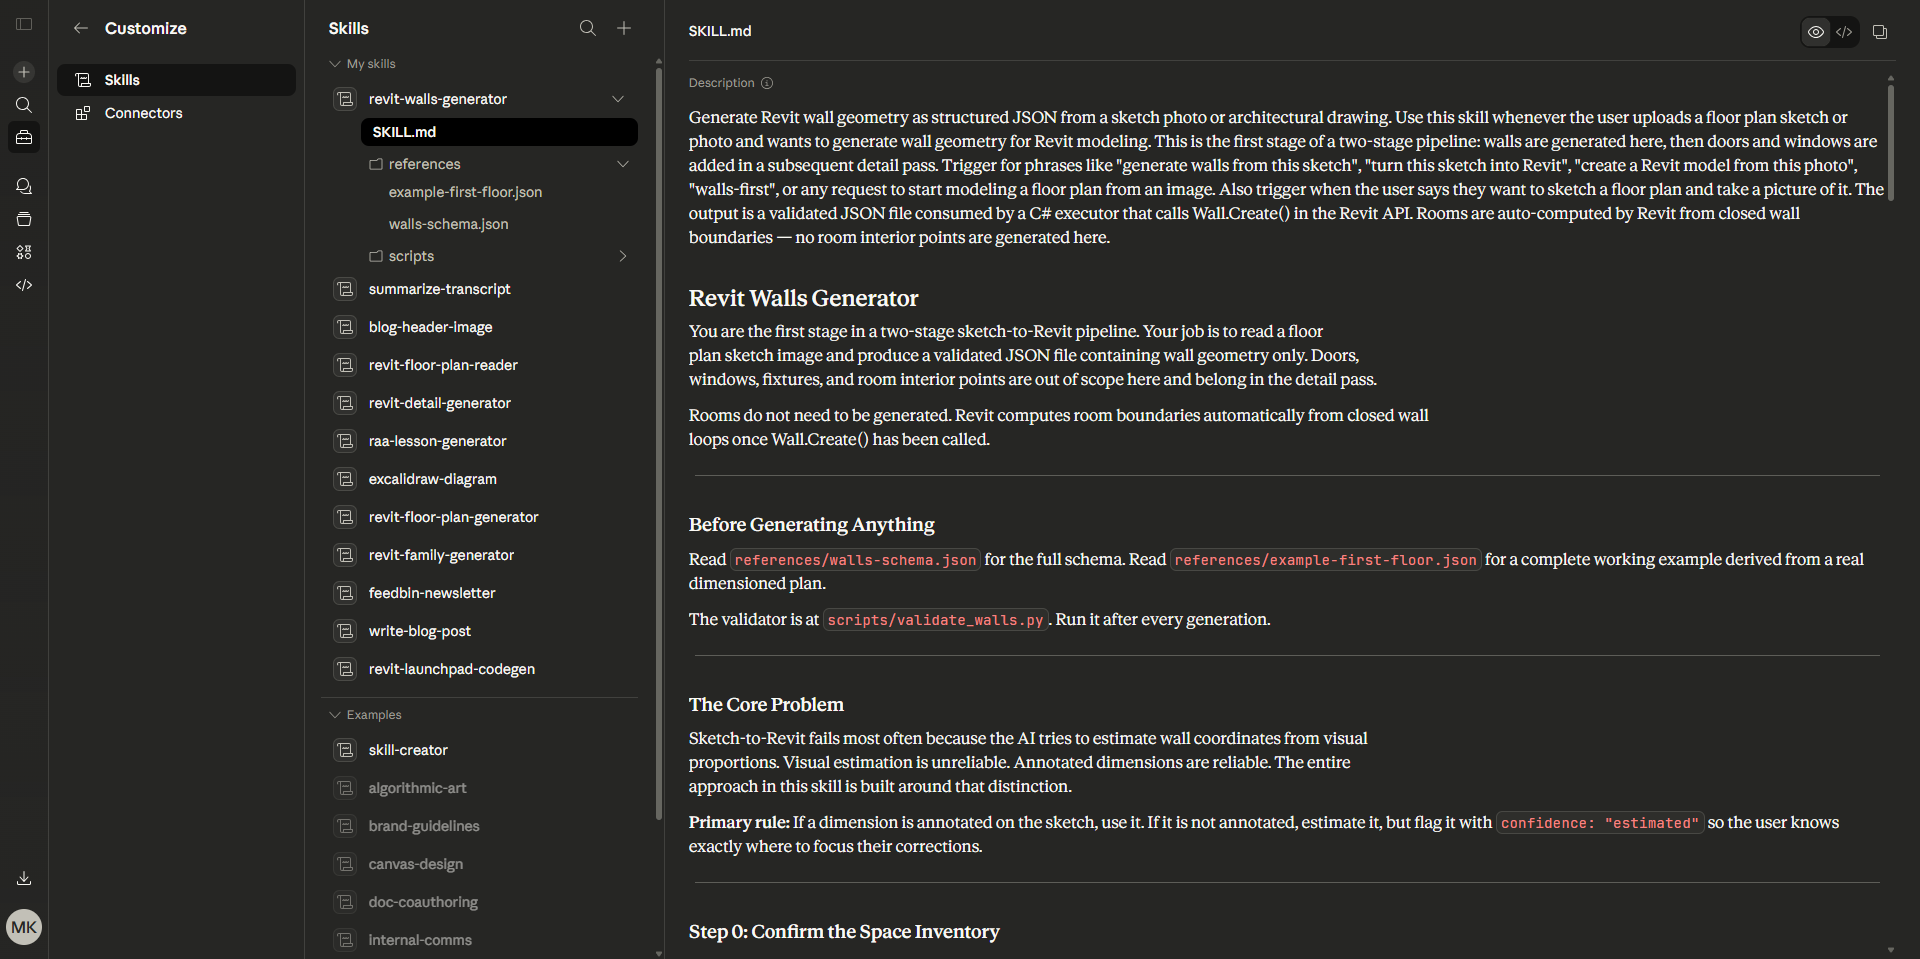
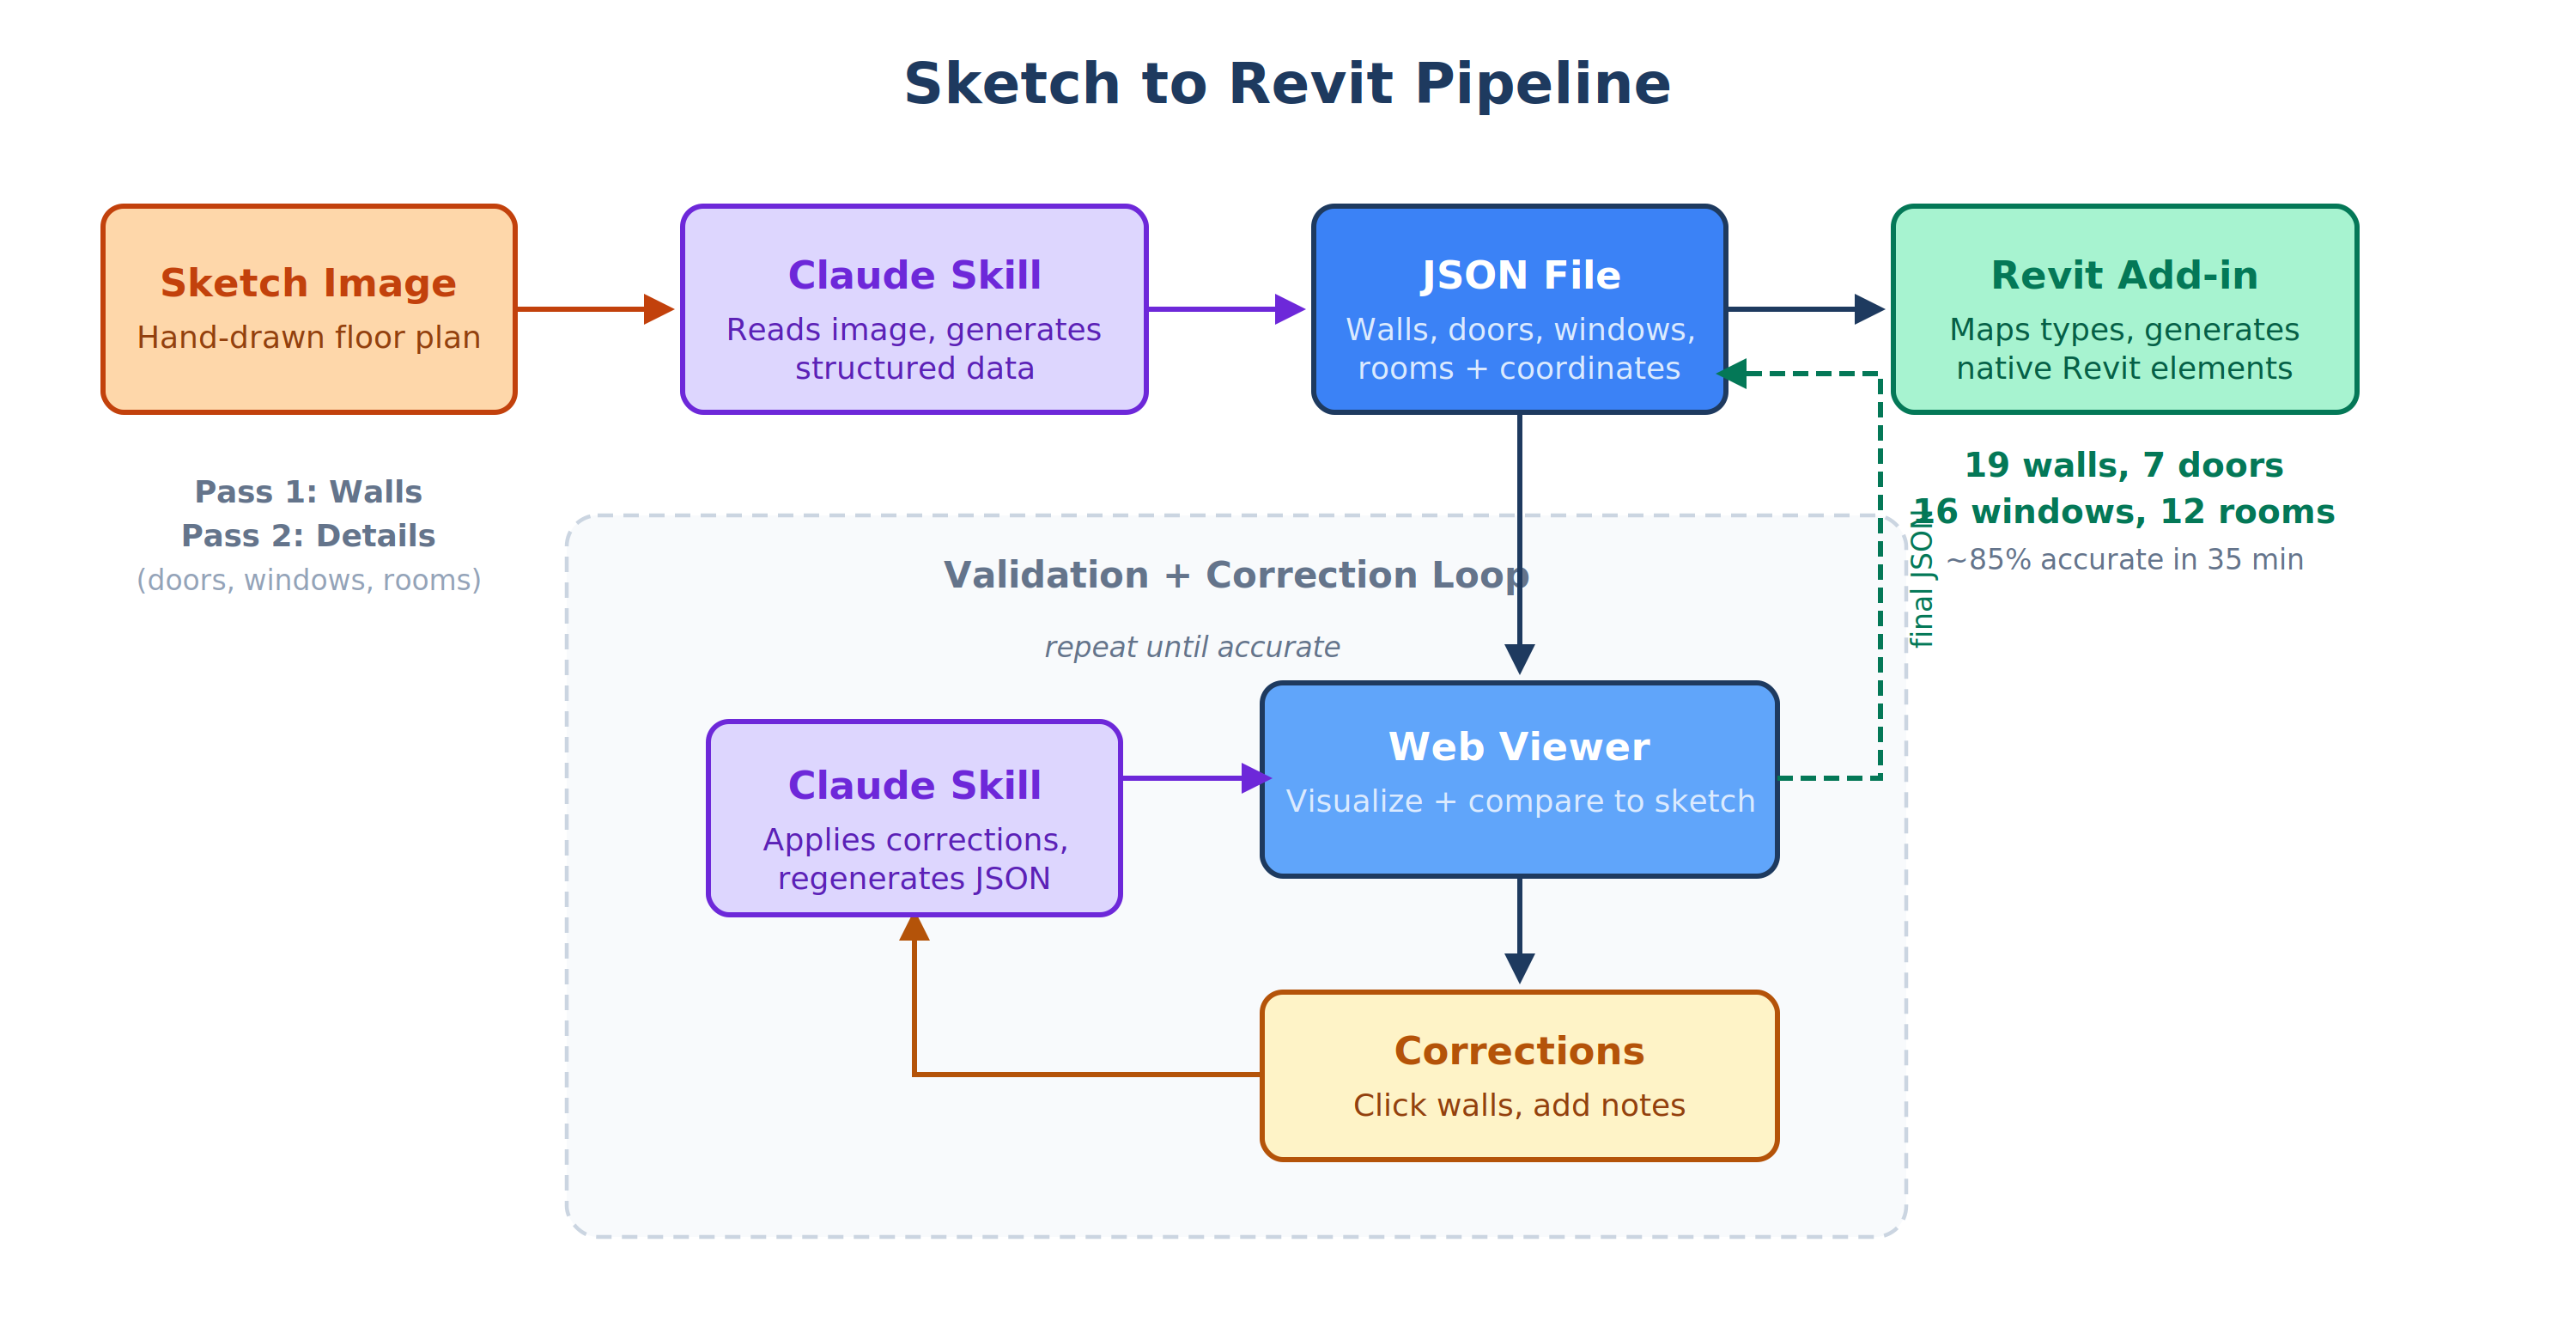 The Claude skill is a predefined set of instructions that tells Claude exactly how to approach the task. Think of it as a scope of work. It knows how to read the sketch image, identify walls, figure out dimensions, and structure everything into a JSON file that follows a specific schema. That schema is the connective tissue of the whole pipeline. It defines coordinates, sizes, element types, and wall properties in a format that’s consistent across all Claude-generated outputs and that another tool (in this case, Revit) can reliably consume.
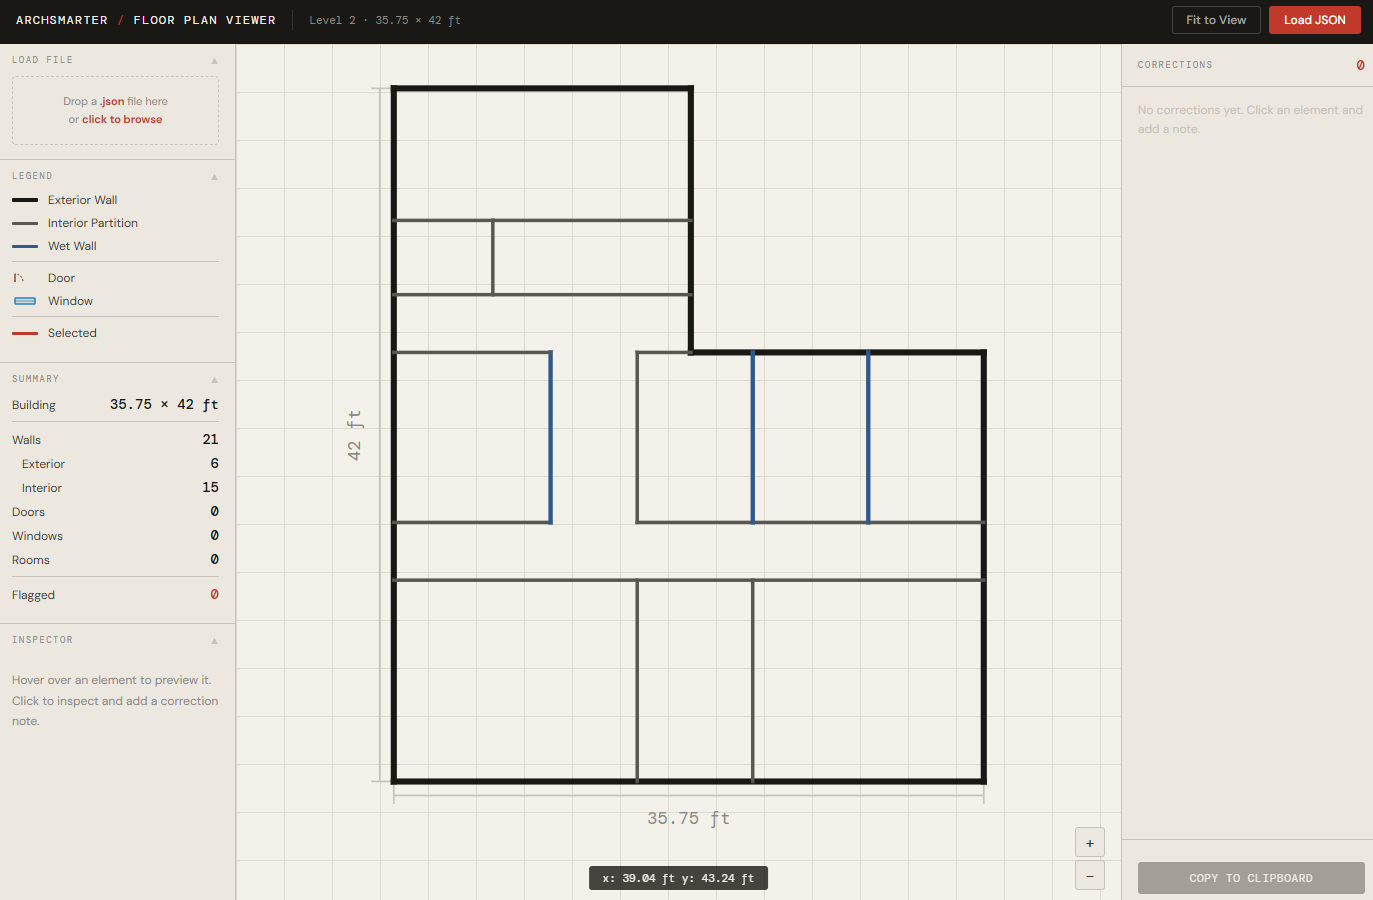
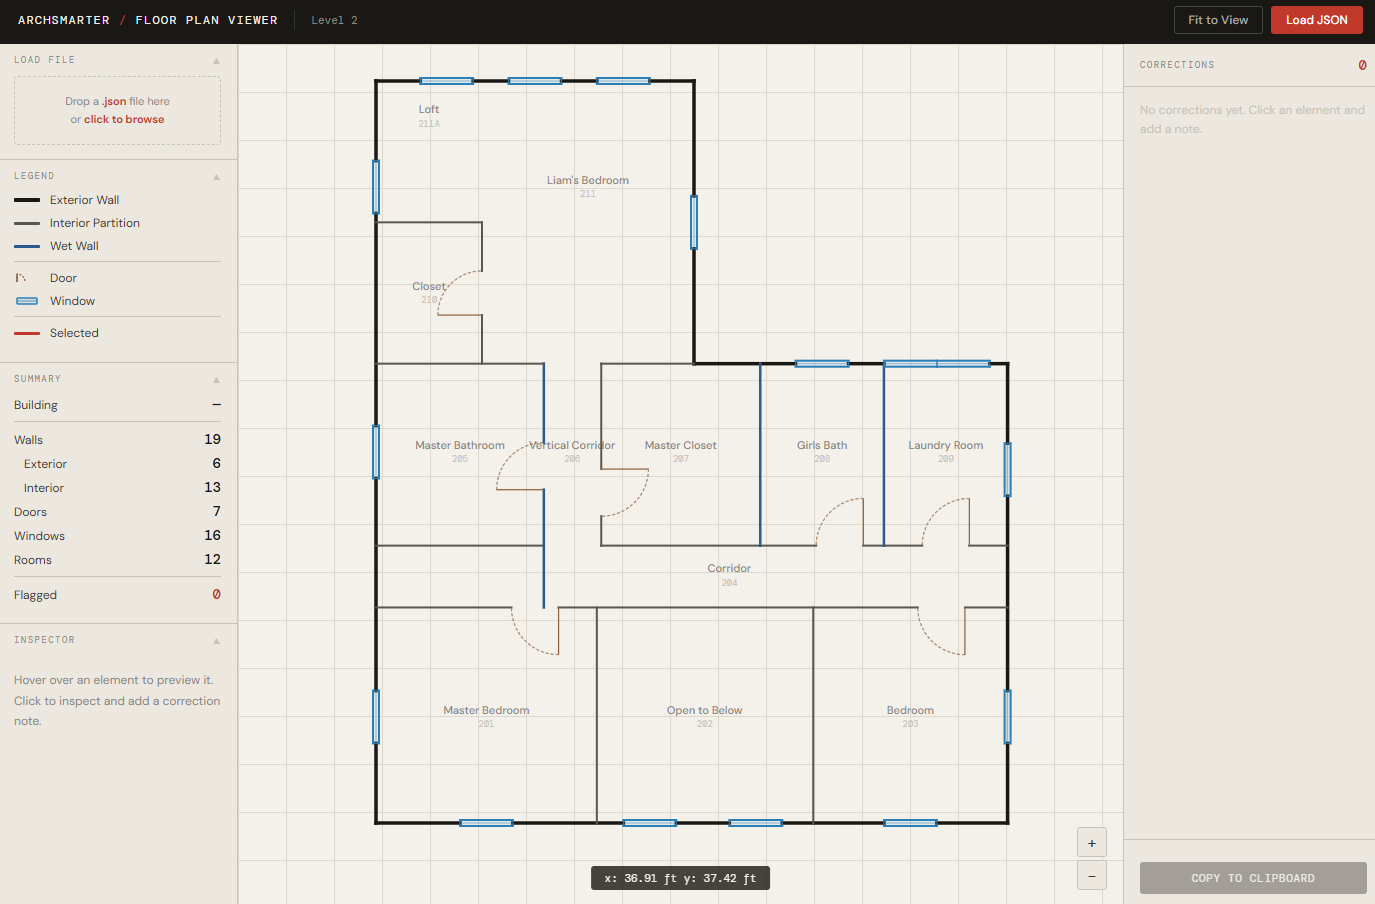
The web viewer is a single-page website that visualizes the JSON data so you can see what Claude produced before committing it to Revit. You can click on individual walls, doors, or windows and add corrections. Those corrections get formatted in a way Claude understands, so you copy them to the clipboard and paste them right back into the conversation. It’s a redlining tool, essentially.
The Revit add-in reads the final JSON file and converts it into native Revit elements. It’s not a dumb importer. It lets you map the wall types Claude identified (exterior, interior, plumbing) to actual Revit wall types in your template. Same for doors and windows. So you get control over how the data lands in your model.
JSON sits at the center of all three pieces. Claude writes it, the viewer displays it, and Revit reads it. That consistency is what makes the pipeline repeatable.
First Pass: Walls
The skill takes a wall-first approach. In my experience, walls are the hardest thing to get right, so they get their own dedicated pass before doors, windows, or rooms enter the picture.
Claude read the sketch and immediately identified all the rooms. Then the questions started. Is there a corridor between the closet and the master bath? Does this hallway connect to that one? Do they form an L shape? What does the 10’-4” dimension on the left side refer to?
This is the part that feels most like working with an intern. A capable one, but someone who hasn’t been to architecture school and doesn’t read plans the way you do. Open spaces and corridors gave Claude the most trouble. A room with four walls and a label? Easy. An unlabeled corridor implied by the negative space between rooms? That requires some back and forth.
The sketch didn’t have complete dimensions either. Some room widths were annotated, but there was no overall dimension string. I gave Claude a couple of key measurements: the renovation area is roughly 26 by 37 feet, and the addition is 18 by 16 feet. That was enough for it to proportion everything else.
The first JSON output loaded into the viewer showed a floor plan that was recognizable but rough. The corridor was too wide. Some wall positions were off. A couple of walls were just wrong. So I clicked on the problem walls in the viewer, typed corrections like “move this wall to be 12’-6” from the west wall” or “extend to corridor B south wall,” copied the batch to the clipboard, and pasted it back into Claude.
The second pass was better. A couple more corrections, another round, and the walls were close enough to move on.
Second Pass: Doors, Windows, and Rooms
With the walls locked in, Claude took a second pass at the same sketch image, this time looking specifically for doors, windows, and room labels. This uses a separate skill that assumes walls already exist and layers the detail on top.
Doors were okay. Not great, but in the neighborhood. A few needed to be moved to adjacent walls or have their swing direction flipped. The viewer made those corrections fast.
Windows were a definite fail. Claude missed most of them on the first attempt. I ended up writing a long list of corrections: add two windows to the master bedroom, add a window to the master bathroom, and add two more to the laundry. There was a lot of feedback. Claude’s response to the correction list was essentially “whoa, that’s a lot of corrections,” which was fair enough.
Rooms came through well. Claude pulled the names directly from the sketch labels and placed them correctly.
After one more round of corrections for the doors and windows, the JSON file was in good enough shape to bring into Revit.
Into Revit
The Revit add-in reads the JSON and presents a summary of its findings. Before generating anything, it asks you to map element types. Claude identified exterior, interior, and plumbing walls as separate categories, so I assigned each a Revit wall type from my template. I used 4 1/2” interior walls, 6” plumbing walls, and wood shingles over wood studs for the exterior. The same mapping process applies to doors (30” by 84”, single flush) and windows (standard double-hung).
One click on the “Generate Floor Plan” button, and it ran. Nineteen walls, seven doors, sixteen windows, twelve rooms. Under a minute.
The result needed some cleanup. A bedroom door was in a strange spot. One wall dimension didn’t translate perfectly. A couple of windows needed nudging. But the bones were there. I tagged the rooms and had a working floor plan without drawing a single wall, placing a single door, or typing a single room name in Revit. All the modeling was based on the data file.
The Honest Math
This process took me thirty-five minutes, start to finish. A lot of that time was waiting for Claude to generate the JSON. The actual hands-on work was typing corrections and clicking through the viewer.
Could I have modeled this faster by hand in Revit? Probably about the same. Maybe faster if I’m being honest. For a small residential renovation like this, an experienced Revit user could knock out the walls and doors in half an hour without breaking a sweat.
So why bother?
Two reasons. First, the 35 minutes include the learning curve of a workflow that’s still being refined. The skill isn’t fully dialed in yet. My prompting can get better. Claude’s image reading will improve. Each of those factors shaves time off future runs. The question isn’t whether this is faster today. It’s whether the trajectory is worth investing in.
Second, this approach separates the thinking from the production. I spent my time reviewing, correcting, and making decisions. Claude did the repetitive coordinate work. That’s a fundamentally different way of working, and it scales differently from manual modeling. A bigger, more complex floor plan might take me proportionally longer to draw by hand, but the correction and review workflow stays roughly the same.
What’s Next
This was the first run of the experiment. I want to try it again in three to six months and see how the tools have improved. A few specific things I’m curious about:
Can Claude handle a bigger, more complex floor plan without falling apart? The residential sketch was a good test case, but a commercial plan with dozens of rooms and multiple corridors would stress the pipeline in different ways.
Can it identify furniture from the sketch? The renovation drawing included some furniture. I didn’t attempt that this time, but it’s a natural next layer.
And can the skill get smart enough about image reading that the first pass needs fewer corrections? That’s where the real time savings would come from.
Right now, I’d call this promising but not production-ready. The pipeline works. The tools connect. The output is usable. But the back-and-forth is still significant, and you need to understand both Revit and the JSON schema well enough to guide the corrections.
If you’re interested in building AI workflows like this into your architecture practice, whether it’s sketch to model pipelines, automated documentation, or other places where AI can handle the production work while you focus on decisions, I’m putting together a course on exactly that. You can join the waitlist here to get notified when it opens.
Get the Thursday Top 5
My weekly email with five interesting and useful links on BIM, design, and technology, plus a few laughs along the way. I send it every Thursday. Join the over 8,000 AEC professionals who already get it.