I've been working on a big project lately. Not a fun project. . . but a big one.
My client has a lot of legacy CAD drawings and they want to bring those drawings into their Revit model. They're working on the second phase of a large campus project. The first phase was done in traditional 2D CAD but they've switched to Revit for the second phase. Since a lot of details are similar, it makes sense to bring those drawings into Revit.
Now, I know you BIM purists are shaking your collective heads in disgust. "BIM plus CAD is just plain bad!" you say.
I disagree.
If done correctly, mixing BIM and CAD can save a lot of time. 2D drawings are really efficient. Why model something when you can communicate the intent in just a few lines and text. And if you already have these details drawn in CAD, it just makes sense to reuse them in Revit.
Sure, you could generate those details from the Revit model. In an ideal world, this would be the right approach. However, most firms have tons of CAD drawings and details that are still useful. They're just in the wrong format.
I know of a number of firms that have resisted moving to BIM because of their extensive CAD detail library. They don't want to lose this repository of knowledge.
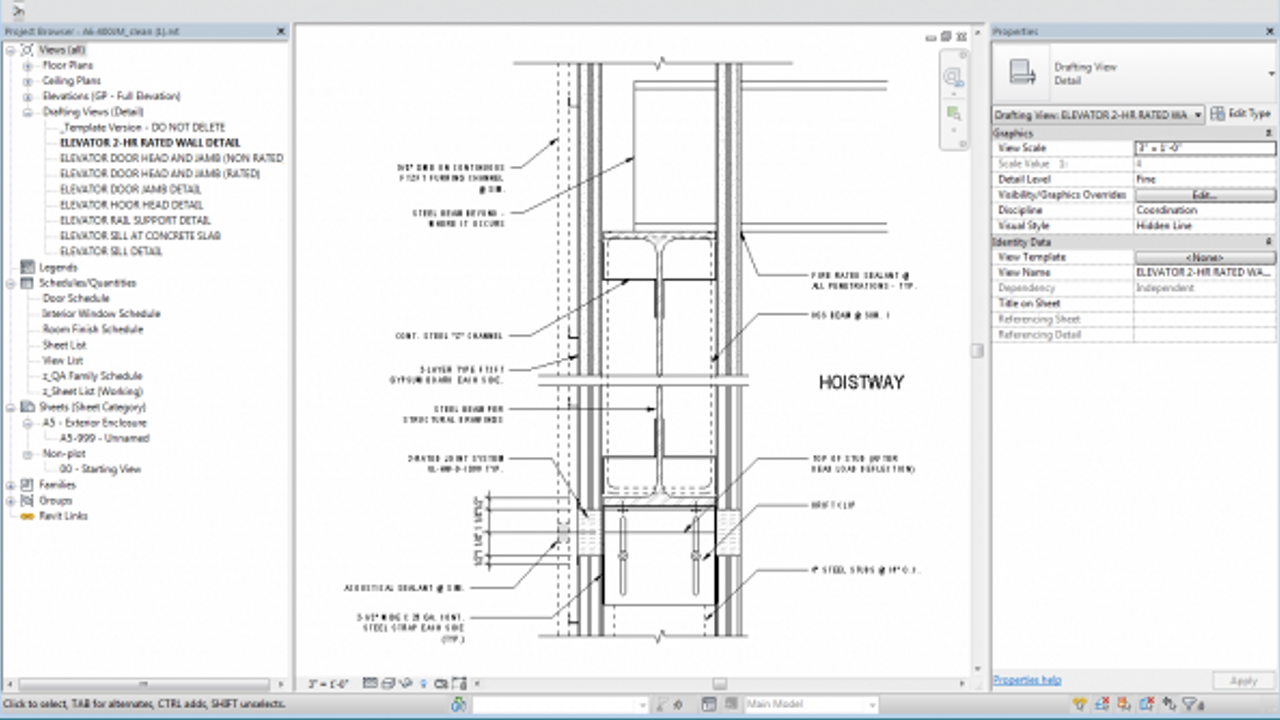
Converting AutoCAD to Revit
There are a few methods for bringing CAD drawings into Revit.
The easiest method is to simply import the drawing into a Revit drafting view and explode it.
GASP! Did he really just say that???
For the record, I definitely DON'T recommend this method. It wreaks havoc in your model. It deposits a whole ton of extra crap in your model. It will make your model cry.

Essentially, every layer in the DWG file becomes a Revit line type. Likewise with every dimension and text style as well as all the fill patterns. Talk about a mess.
Rather than suffer through that, there are three better methods I could use to manually convert the details. The methods are:
- Link the details into a Revit Drafting View and change the visibility and line styles of the elements
- Import the details into a new Revit file. Explode the details and convert the elements to Revit line styles. Transfer the cleaned-up details into the project file.
- Trace the linked details in Revit using this method.
Given the number of details I had to convert, these methods weren't going to work. Instead, I needed to take a smarter approach.
How to (semi) automatically convert AutoCAD to Revit
First off, I realized I would need to automate the process as much as possible. This would save time and also ensure the resulting Revit details, were consistent. I already had some tools in place but I needed to fill in a few gaps to make my process more time-efficient.
Here are the 5 things I learned as I worked through the process of (mostly) automating the AutoCAD to Revit conversion:
1. Outline the process
I knew I couldn't do this work manually. There aren't enough hours in the day plus no one would want to pay me to do it manually. To get my head around the process, I outlined each step. The outline evolved as I got more into the project and I understood the specific issues I was likely to encounter. Here's the abbreviated version:
- Clean up and purge the AutoCAD drawing then consolidate the AutoCAD elements by type on separate layers.
- Link each DWG file into its own drafting view in Revit.
- Convert the DWG lines and hatches to Revit lines and filled regions.
- Convert DWG dimensions and text to Revit styles.
- Double-check the detail and fix any issues
- Detach the linked file.
The beauty of the outline is that I can use it to fine-tune my process. As I did more and more conversions, I added to my outline until it was very detailed. I then used it as a guide to determine where I could automate steps.
2. Automate as much as you can
It goes without saying that the more you can automate, the more time you save and the more consistent the end product. After I outlined the process, I looked at each step and thought about how to best automate part or all of the steps. In some cases, like linking the DWG files into new drafting views and converting the DWG lines to Revit lines, I had existing tools (courtesy of the
Smart-Pack for Revit add-in). But others I had to create from scratch.
For example, the Revit API doesn't read DWG dimensions or text. It's a total bummer. But since I didn't want to create these manually, I needed to get creative.
To do this, I wrote an AutoCAD macro that exports the drawing's dimension, hatch, leader, and text data out to Excel. Here's what the output looks like:

I then wrote a Revit macro that reads this data and recreates the elements using Revit styles and fill patterns. It sounds a little complicated (and it is) but it works like a charm.

Using this tool, I'm able to transfer all the annotation and hatches from AutoCAD to Revit in less than a minute.
3. Know when to stop automating
There's a point when the time required to automate something far exceeds the time required to just do it manually. I reached this point a couple of times, specifically with dimensions and hatches.
The export to Excel method I mentioned above isn't 100% perfect. Text and leaders work great. I have to manually adjust the leader landing position but it's not too difficult – I can usually do this in a few minutes. Below is a screenshot of the typical output.

Hatches convert most of the time. The Revit macro has trouble with arcs and curves so these usually don't convert. I've found that the macros get about 70% of the hatches. The remaining 30% I have to re-create manually. Ugh. . .
Creating dimensions automatically was a total nightmare. Since Revit dimensions are tied to geometry, I had to create extra lines so I could generate the dimension string. This didn't work reliably and added a lot of extra junk to the file. In the end, I abandoned converting dimensions, and instead, I just add them manually.
4. Garbage in, garbage out
I learned early on that good, clean DWG files are essential for a smooth conversion.
After the first 20 or so drawings, I realized the process would be much faster if I gave the DWG files a thorough scrub before linking into Revit.
I wrote a few AutoCAD scripts that consolidated the existing layers by color and line type. Since the
DWG to RVT tool reads the drawing's layers, it takes some time to map the layers to Revit line styles. Reducing the overall number of layers sped this process up considerably.

Also, the script moves all dimensions, hatch, and text to separate layers. This lets me check them individually plus I can filter them out of the conversion process since I'm using a separate process to insert this data.
5. There's no easy button
My original ambition was to create a system where I could simply select the DWG files and, through a series of magical scripts and macros, fully converted RVT files would spit out the other end. Preferably with some confetti and a little trumpet blast. Fat chance of that.
The issue is that every drawing is different. It's hard to standardize something that's not very standard.

While I would like the process to be full-auto, it is, at best, semi-automatic. I still need to babysit the scripts and double-check each step. This isn't necessarily a bad thing but it does take time.
Conclusion
So yeah, this wasn't a glamorous project. Not by a long shot. But it was important. Again, why re-create the wheel (or detail) when you have it already? Using this method, I was able to convert the 500 or so drawings in about a week. Much better than doing it manually and it saved my client a lot of time and money.
That said, there's still a lot of room for improvement. First off, the process relies on a lot of different scripts and tools that I created on the fly. I need to consolidate and streamline the tools so the process is easier and smoother. Second, I need to refine the tools to deal with things like arcs and curves in hatches. Doing these hatches manually is only a short-term solution. Lastly, I need a way to automate dimensions. Doing this manually isn't sustainable in the long run.
The plan is to get this sorted out during the next 500 details.
How about you?
Have you converted AutoCAD details to Revit? If so, how did you do it? What was your process?
Get the Thursday Top 5
My weekly email with five interesting and useful links on BIM, design, and technology, plus a few laughs along the way. I send it every Thursday. Join the over 8,000 AEC professionals who already get it.