
The best thing about Revit templates is how much time they can save you. The worst thing about Revit templates is how much time they take to create.
It’s a bit of a catch-22. In order to save time, you need to spend time.
It’s not easy to find that time when you have billable projects to work on and deadlines to meet. Believe me, I know.
And once you do finish the template, how often do you review it and keep it updated? What if you have a project that’s a new building type? Does your template still work for that kind of building? What if you need to follow an owner’s BIM standard? Can you modify your template to fit their requirements?
The C-B-T Method
Every project is different. Because of that, your Revit templates should not be one-size-fits-all. That’s why I recommend a modular approach to build Revit templates. I call it the C-B-T method.
By C-B-T, I’m referring to Chassis – Body – Trim.
“Wait a minute”, you’re thinking. “Aren’t those parts of a car?”
Exactly. We’re going to approach building a Revit template the same way cars are designed and built.
Think about it. Car manufacturers need to be super-efficient. They design something and then reuse it in multiple ways. For example, Ford sells a truck called the Super Duty Chassis Cab. It’s basically a truck cab up front with an empty chassis in the back.
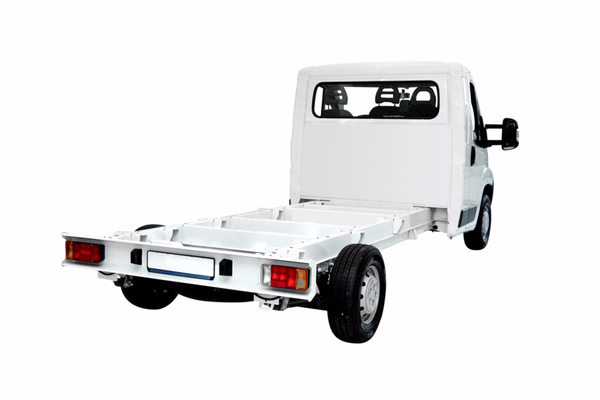
The chassis can be customized to do whatever job is needed. Need a dump truck? No problem. Want to add a bucket loader? Done. What about lots of bins and storage? Easy.
With the Chassis Cab, Ford created a flexible framework that can be easily modified to handle specific jobs. We need something similar for our Revit templates. Too often, we build templates that are difficult to update and modify. To really save time, you need the right template for the job.
That’s why you should build modular template components instead of a one-size-fits-all approach. Using a base template or chassis, you create more specific templates or bodies for specific project types. You can then customize those templates for each project by adding the trim. The idea is to build up our template starting with the most general content (the chassis) to the most specific (the trim).
Here’s an example of how my Revit templates are organized.
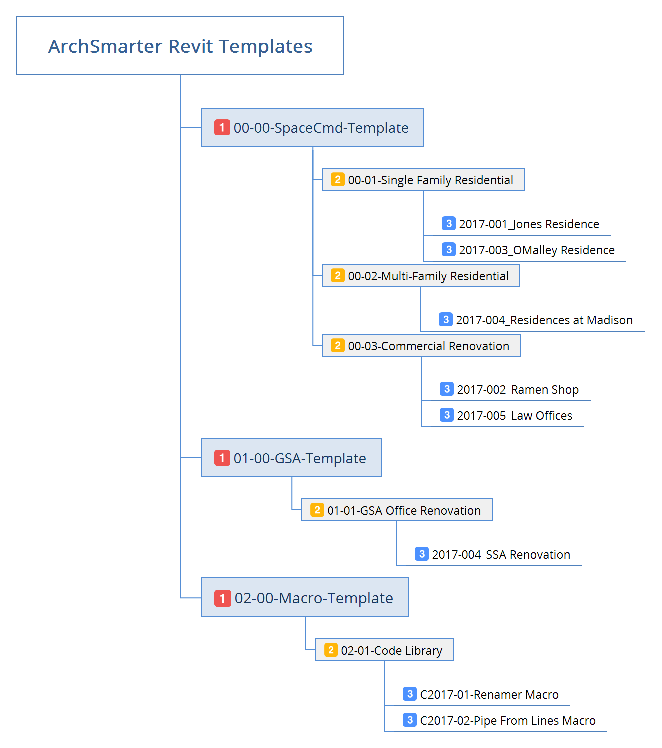
As you can see, there’s a clear progression from the chassis to the body to the trim. A single chassis template can be used to create multiple body templates. Now, let’s take a look at the parts of the C-B-T method in detail.
1. The Chassis
The chassis is the structural frame of your Revit template. It includes all the essential elements and nothing more. These are things that won’t change from project to project. Your chassis should include text and dimension styles, symbols, and line weights. Filled patterns and filled region types should also be included.
Be sure to name all of the elements you’re adding with a specific prefix. I like to prefix all chassis elements with my firm’s abbreviation. This identifies my essential chassis elements from any out-of-the-box or imported content.
Depending on the type of work you do, you may need multiple chassis templates. If you do government or institutional work, you likely need to follow a specific BIM standard. Create a specific chassis for these projects.
Once you have the chassis template, save it with a unique file name. I like to use numbers to identify my template modules so I call my office standard chassis “00-00-SpaceCmd Template.rte”.
Lastly, be sure to use a starting view that indicates the version of the chassis template.
2. The Body
The body module builds off the chassis module, like how different car bodies use the same chassis. This template adds project-type elements to your office standard content.
The scope of this template includes your sheet and view setups. Also include title blocks, schedules, and standard system families specific to the project type. Identify any required shared parameters for this project type and include them as well.
Like in the chassis template, elements added at the body template stage should follow a specific naming convention. This convention should reference the chassis number and have its own unique identifier. I like numbers so a template for multi-family residential projects that is built on the “00” chassis would have the code “00-01. A commercial template also built on the “00” chassis would be “00-02”. Content added specifically to this template would use the code as a prefix. This will help identify office standard from project-specific content.
Likewise, the body template should be saved using the number code as well as a brief description (i.e. “00-01-Multi-family Template.rte” or “00-02-Commercial.rte”).
One note – the body template shouldn’t include any file-based families, like doors or windows. The idea with the C-B-T method is to keep the template files as lean as possible. Rather than bloat your chassis or model templates with file-based families, we’re going to load them in the trim template below.
3. The Trim
So you’ve picked out the model car you want. But what style of wheels do you want? What about the seats? Do you want cloth or leather (trust me, go with leather if you have little kids)? And don’t forget the interior. That wood finish looks pretty sharp.
Like every car model has different levels of trim, your body template should also allow for different levels of project-specific customization.
I’m an advocate of keeping Revit files as lean as possible. Revit files get big on their own. You don’t need to add any extra elements in there. So rather than loading up your templates with families you <might> use, I recommend demand loading them when you need them.
Rather than creating another template for the trim level, I recommend starting your project using the body template .rte file and then loading in the project-specific content using a macro or add-in that inserts families from a list in Excel.
You can review and update family sets more easily in Excel than if they were pre-loaded in a template file. A content library system, like Avail or Unifi, is also a good option.
Since we’re working at the project level now, we need a way to differentiate our project or trim content from chassis and body content. For trim content, I like to use the project number as a prefix.
Next Steps
A well-conceived Revit template can save you a lot of time. Templates let you leverage your time again and again.
More often than not, Revit templates are created as a one-size-fits-all solution. Every project is different. Why bloat your template with stuff you’re never going to use?
The C-B-T method gives you the flexibility to create custom Revit templates. By using a modular approach, you can more easily update your templates and create new ones as needed. Likewise, each template can be customized to meet project-specific requirements.
Get the Revit Template Checklist
For a full list of what to include in your body template, join ArchSmarter below and get my free Revit Template Checklist plus a lot more!
Get the Thursday Top 5
My weekly email with five interesting and useful links on BIM, design, and technology, plus a few laughs along the way. I send it every Thursday. Join the over 8,000 AEC professionals who already get it.